


 Arrays
 Converters
THIS POST WAS CROPPED FROM MASTERING JAVASERVER FACES 2.2 BOOK
The flow scope allows developers to group pages/views and demarcate
The flow scope allows developers to group pages/views and demarcate
the group with entry/exit points.

Between the request scope and the session
scope, we have the CDI flow scope. This scope exists for a while in Spring Web
Flow or ADF flow, and now is available in JSF 2.2 as well. Basically, the flow
scope allows us to demarcate a set of related pages/views (usually, logic
related) with an entry point (known as start node) and an exit point (known as
return node).
! The flow scope is a good choice for
applications that contain wizards, such as multi-screen
subscriptions/registrations, bookings, and shopping carts. Generally speaking,
any chunk of an application that has a logical start point and an end point can
be encapsulated into the flow scope.
In the same application, we can define
multiple flows, which can be seen as modules that are reusable and capable to
communicate. They can be called sequentially, can be encapsulated as Matrioska
dolls or can create any custom design. Moreover, it is very easy to move,
delete, or add a flow into such an application just by plugging in/out the
entry and exit point.
To understand the benefits of using the flow
scope, you have to identify some disadvantages of the applications that don't
use it. They are listed as follows:
The flow scope allows us to define
logical units of work.
Each application is a big flow, but usually
pages do not follow any intuitive logical design. Apparently, a disordered
order governs even when pages are logically related, such as pages of a wizard
or of a shopping cart.
The flow scope provides reusability.
Reusing pages can be a difficult task to
accomplish, since pages are so tied up to UI components and user interaction.
Flow better than CDI
CDI provides conversation scope capable of
stretching over several pages, but the flow scope fits better for JSF.
Data in a flow is scoped to that flow
alone; therefore, flows can be opened in multiple windows/tabs.
As the conversation scope, the flow scope
covers a set of pages/views, but it has several main advantages, such as it is
much more flexible, doesn't need that clumsy begin/end operation, flow scoped
beans are created and destroyed automatically when the user enters or exists into/from
a flow, provides easy-to-use support for inbound/outbound parameters, and pre-handlers
and post-handlers. A normal flow cannot be opened in multiple windows/tabs
because information travels between pages with the session scope.
The nodes define the entry and exit points of
a flow and there are five types of nodes, which are listed as follows:
View: This represents any JSF page in the
application that participates in the flow. It is known as a view node
of the flow.
The method call: This indicates an invocation of a method
using EL. The called method may return an outcome that indicates which node should
be navigated next.
Switch: The switch case statements are a substitute
for long if statements. The cases are represented by EL expressions and are evaluated
to boolean values. Each case is accompanied by an outcome that will be used
when the condition is evaluated to true. There is also a default outcome that will be
used when all cases are evaluated to false.
The flow call:
This is used to call another flow in the current flow—these are transition points
between flows. The called flow (known as inner or nested flow) is nested in the
flow that calls it (known as calling flow or outer flow). When the nested flow
finishes its tasks, it will return a view node from the calling flow, which
means that the calling flow will have control only after the nested flow's
lifespan
comes to an end.
The flow return:
This can be used for returning an outcome to the calling flow.
Flows can pass parameters from one to the
other. Parameters sent by a flow to another flow are known as outbound
parameters, while parameters received by a flow from another flow
are known as inbound
parameters.
Well, at this point, you should have enough
information about the flow scope to develop some examples. But, before doing
this, you need to be aware of some tags, annotations, and conventions.
The flow definition is based on a set of
conventions over configuration. A flow has a name, a folder in the web root of
the application reflecting the flow name, and a view representing the start
node that also reflects the flow name. This folder groups the pages/views that
belong to the same flow.
In order to use a flow, you need to accomplish
some configuration tasks. These can be done through a configuration file or
programmatically. If you choose the first approach, then the configuration file
can be limited to one flow, which means that it is stored in the flow folder
and is named in the format flowname-flow.xml, or you can use the faces-config.xml file for having all flows in a single place.
Since our first example uses the configuration
file, we need to use tags. The main tags used for configuring a flow are as
follows:
<flow-definition>:
This tag contains an id
attribute that uniquely identifies the flow. The value of this ID is the flow name
used to reference the flow from JSF pages or beans.
<view>:
It is nested in the <flow-definition> tag and indicates the JSF pages that
represent the flow nodes; it associates an explicit ID to each page (Facelet)
path (further, you can refer to each page by its ID). The page path is mapped
in a <vdl-document>
tag, nested in the <view> tag. The presence of this tag is optional,
but as a convention, at least the <view> tag indicating the start node (start page) is
present, especially if you want to set another start node besides the default
one, which is represented by the page in the flow with the same name (ID) as
the flow. Further, you can use the optional <start-node>ID</start-node> tag and indicate the ID of the <view> tag that maps the custom starting page. As an
alternative, the start node of the flow can be indicated by setting the value
of the id
attribute of a <view> tag as the flow ID, and the content of the
encapsulated <vdl-document> tag as the path of the custom starting page.
When you refer to the flow ID, JSF will go to that page and automatically put
you in the flow.
<flow-return>:
It is nested in the <flow-definition> tag and returns an outcome to the calling
flow. You can refer to it through the value of the id attribute. There are at least three ways of
getting out of a flow: using <flow-return>, using <flow-call>
(presented later), or by abandoning
the flow.
! We just said that
a flow is identified by an ID (by a name). But, when the same flow name is
defined in multiple documents (like in big projects that use multiple packaged
flows from different vendors), there is one more ID needed. This ID is known as
the document
ID. Thus, when you need to identify a flow whose name appears in different
documents, we need the flow ID and the defining document ID. Most of the time
the document ID is omitted; therefore, it is not demonstrated in this section.
In this section, you will see just a few hints about it.
In order to define the simplest flow, you need
to be aware of the following diagram:

The simple flow
With these three tags, <start-node> and/or <view>, <flow-return>, and <from-outcome>, you can configure a simple flow, like a
peddling registration form. Let's suppose that a tennis player registers online
to a tournament through a flow made up of two JSF pages (the flow name will be
registration): a page containing a form used for collecting data and a
confirmation page. Moreover, there will be two pages outside the flow, one for
entering into the flow (like the first page of the website), and one that is
called after confirmation.
In the following diagram, you can see an image
of our flow:

Let's have a look at the code for the first
page that is outside the flow and outside the registration folder (index.xhtml) as follows:
<h:body>
In flow ? #{null !=
facesContext.application.flowHandler.currentFlow}
Flow Id:
#{facesContext.application.flowHandler.currentFlow.id}
REGISTER NEW PLAYER
<h:form>
<h:commandButton value="Start
Registration" action="registration"
immediate="true"/>
</h:form>
</h:body>
Two important things can be observed here.
First, the following lines:
#{null
!= facesContext.application.flowHandler.currentFlow}
#{facesContext.application.flowHandler.currentFlow.id}
The first line returns a boolean value
indicating whether the current page is or is not in a flow. Obviously, the index.xhtml page is not in a flow; therefore, false will be returned. You can use it for tests.
The second line displays the ID of the current flow.
Further, you need to take a look at the value
of the attribute action of the <h:commandButton> tag. This value is the name (ID) of our flow;
after the window context is enabled, JSF will search the indicated flow and
navigate to the start node of the flow. By default, the window context is disabled.
Therefore, when the button labeled Start
Registration is clicked, the
application steps in the registration flow and loads the start node page
represented by the registration.xhtml page. The code for this page is as follows:
<h:body>
First page in the 'registration' flow
In flow ? #{null !=
facesContext.application.flowHandler.currentFlow}
Flow Id:
#{facesContext.application.flowHandler.currentFlow.id}
You are registered as:#{flowScope.value}
<h:form>
Name & Surname:
<h:inputText id="nameSurnameId"
value="#{flowScope.value}" />
<h:commandButton value="Register To
Tournament" action="confirm"/>
<h:commandButton value="Back(exit
flow)" action="taskFlowReturnIndex"/>
</h:form>
</h:body>
Since we are in the flow, currentFlow will return true.
It is more important to focus on the implicit
object, flowScope - implicit object (which indicates the
current flow) is used for sharing data through the entire flow and maps to facesContext.getApplication().getFlowHandler().getCurrentFlowScope(). For example, the value of the <h:inputText> tag can be put into the flowScope object and can be read from the flow scope in
the next page, as follows:
#{flowScope.value}
The button labeled Register
To Tournament navigates to the
second page in the flow, confirm.xhtml; this is a usual navigation case, there is
nothing to say here. But the other button navigates outside the flow (to index.xhtml) by indicating the ID of a flow return. In
the configuration file, this flow return is as shown in the following code:
<flow-return
id="taskFlowReturnIndex">
<from-outcome>/index</from-outcome>
</flow-return>
The code of the confirm.xhtml page is as follows:
<h:body>
Second page in the 'registration' flow
In flow ? #{null !=
facesContext.application.flowHandler.currentFlow}
Flow Id:
#{facesContext.application.flowHandler.currentFlow.id}
You are registered as:#{flowScope.value}
<h:form>
<h:commandButton value="Back (still
in flow)" action="registration"/>
<h:commandButton value="Next (exit
flow)" action="taskFlowReturnDone"/>
</h:form>
</h:body>
This page displays the data that was entered
and stored on the flow scope along with both the buttons. The first button
navigates back to the registration.xhtml page, while the other one navigates to the done.xhtml page, which is outside the flow. The flow
return is identified by the ID, as shown in the following code:
<flow-return
id="taskFlowReturnDone">
<from-outcome>/done</from-outcome>
</flow-return>
The done.xhtml page just checks to see if the page is in
flow and displays a simple message, as shown in the following code:
<h:body>
In flow ? #{null !=
facesContext.application.flowHandler.currentFlow}
Flow Id:
#{facesContext.application.flowHandler.currentFlow.id}
REGISTER NEW PLAYER ENDED
</h:body>
The final step is to define the flow in a
configuration file. Since you have a single flow, you can create a file registration-flow.xml in the registration folder. The following is
the code of the registration-flow.xml file:
<faces-config
version="2.2" xmlns="http://xmlns.jcp.org/xml/ns/javaee"
xmlns:xsi="http://www.w3.org/2001/XMLSchema-instance"
xsi:schemaLocation="http://xmlns.jcp.org/xml/ns/javaee
http://xmlns.jcp.org/xml/ns/javaee/web-facesconfig_2_2.xsd">
<flow-definition
id="registration">
<view id="registration">
<vdl-document>/registration/registration.xhtml</vdl-document>
</view>
<flow-return
id="taskFlowReturnIndex">
<from-outcome>/index</from-outcome>
</flow-return>
<flow-return id="taskFlowReturnDone">
<from-outcome>/done</from-outcome>
</flow-return>
</flow-definition>
</faces-config>
You can also place the following code inside
the faces-config.xml
file in the <faces-flow-definition> tag:
<faces-flow-definition>
<flow-definition
id="registration">
...
</faces-flow-definition>
The complete application is available here.
Flow
with beans
Beside pages, a flow can contain beans. A bean
defined in a flow is annotated with @FlowScoped; this is a CDI annotation that enables
automatic activation (when the scope is entered) and passivation (when the
scope is exited). The @FlowScoped bean requires an attribute named value that contains the flow ID. The data stored in
such a bean is available in all pages that belong to that flow.
! The flow scope
bean might get passivated by the container and should be capable of passivity
by implementing the java.io.Serializable interface.
Adding a bean in the registration flow can
modify the initial diagram, as shown in the following diagram:

As you can see, the bean will store the data
collected from the registration form in the flow scope (in the previous
example, this data was passed using the flowScope implicit object). The button labeled Register
To Tournament will call the registrationAction() bean method, which will decide if the registration
is possible and return the flow back to the registration.xhtml page or next to the confirm.xhtml page.
The registration.xhtml page's code is modified as follows:
<h:body>
First page in the 'registration' flow
In flow ? #{null !=
facesContext.application.flowHandler.currentFlow}
Flow Id:
#{facesContext.application.flowHandler.currentFlow.id}
Your registration last credentials: #{registrationBean.playerName}
#{registrationBean.playerSurname}
<h:form>
Name: <h:inputText
value="#{registrationBean.playerName}"/>
Surname: <h:inputText value="#{registrationBean.playerSurname}"/>
<h:commandButton value="Register To
Tournament" action="#{registrationBean.registrationAction()}"/>
<h:commandButton value="Back (exit
flow)" action="taskFlowReturnIndex"/>
</h:form>
</h:body>
The code of RegistrationBean is as follows:
@Named
@FlowScoped(value="registration")
public
class RegistrationBean implements Serializable {
private String playerName;
private String playerSurname;
//getters and setters
public String getReturnValue() {
return "/done";
}
public String registrationAction(){
//simulate some registration conditions
Random r= new Random();
int nr = r.nextInt(10);
if(nr < 5){
playerName="";
playerSurname="";
FacesContext.getCurrentInstance().addMessage("password",
new FacesMessage(FacesMessage.SEVERITY_ERROR, "Registration failed!",""));
return "registration";
} else {
return "confirm";
}
}
}
The code is self explanatory, but what about
the getReturnValue()
method? Well, this is just an example of how a flow scoped bean can indicate
the outcome of a flow return. Instead of using the following code:
<flow-return
id="taskFlowReturnDone">
<from-outcome>/done</from-outcome>
</flow-return>
You can use the following code:
<flow-return
id="taskFlowReturnDone">
<from-outcome>#{registrationBean.returnValue}</from-outcome>
</flow-return>
The complete application is available here.
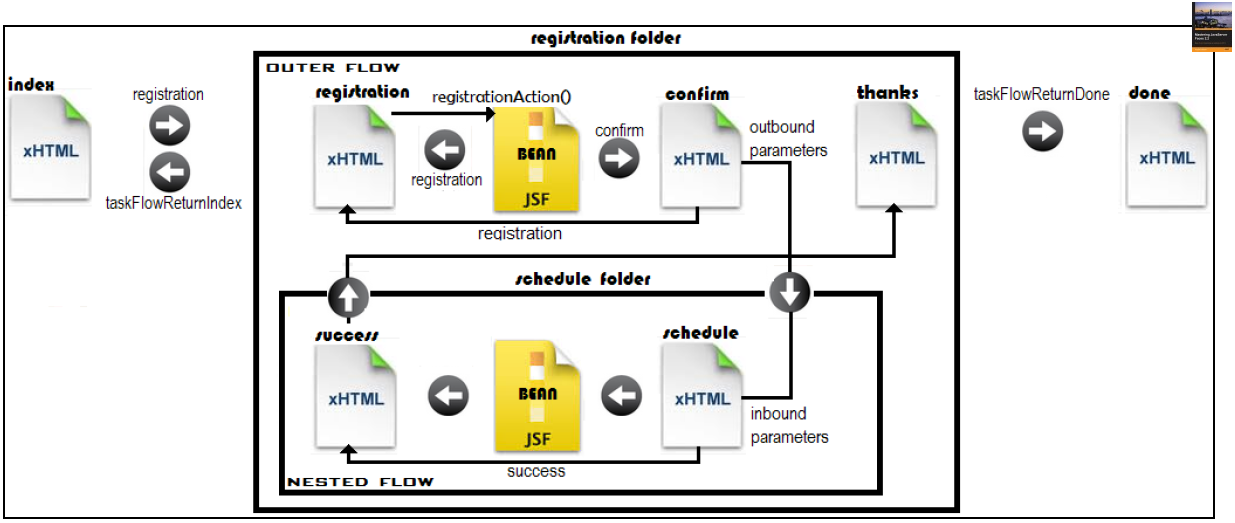
Nested
flows
Well, now let's complicate things by adding
another flow under the existing one. Let's suppose that after the registration,
the player has to indicate the day and the hour when he is available to play
the first match. This can be accomplished in a new flow named schedule. The registration flow will call the schedule flow and will pass some parameters to it. The
schedule flow will return
in the registration flow, which will provide a simple button for
navigation outside the registration flow.
! The nested flow
returns only in the calling flow. You have to refer to a page of the calling
flow in the <flow-return> tag of the nested flow, including the pages
returned by the calling flow.
Passing parameters is a thing that requires
more tags in the configuration tag. Therefore, you need to know the following
tags:
<flow-call>:
This calls another flow in the current flow. This tag requires the id attribute. The value of this attribute will
be used to refer to this flow call.
<flow-reference>:
This is nested in the <flow-call> tag and contains the ID of the flow that must
be called.
<outbound-parameter>:
This is nested in the <flow-call> tag and defines parameters that must be
passed to the called flow.
<inbound-parameter>:
This defines the parameters passed from another flow.
In order to see these tags at work, you need
to take a look at the application flow. The diagram of the application will
change as follows:
We resume our discussion from the confirm.xhtml page (defined in the registration flow). From this page, we want to navigate to
the schedule.xhtml
page, which is available in the schedule flow (the /schedule folder). For this, we can add a new button,
labeled Schedule, as shown in the following code:
<h:form>
<h:commandButton value="Back (still in
flow)" action="registration"/>
<h:commandButton id="Next"
value="Schedule" action="callSchedule" />
<h:commandButton value="Next (exit
flow)" action="taskFlowReturnDone"/>
</h:form>
The button's action attribute value is the ID
of the <flow-call> tag. When the button is clicked, JSF locates
the corresponding <flow-call> tag and follows the flow with the ID
indicated by the <flow-id> tag, as shown in the following code:
<flow-call
id="callSchedule">
<flow-reference>
<flow-id>schedule</flow-id>
</flow-reference>
...
</flow-call>
Moreover, we want to pass several parameters
from the registration flow to the schedule flow: the player name
and surname (stored in the flow scoped RegistrationBean bean) and a constant representing some
registration code (it can also be generated based on certain rules). This can
be accomplished by the <outbound-parameter> tag, as shown in the following code:
<flow-call
id="callSchedule">
<flow-reference>
<flow-id>schedule</flow-id>
</flow-reference>
<outbound-parameter>
<name>playernameparam</name>
<value>#{registrationBean.playerName}</value>
</outbound-parameter>
<outbound-parameter>
<name>playersurnameparam</name>
<value>#{registrationBean.playerSurname}</value>
</outbound-parameter>
<outbound-parameter>
<name>playerregistrationcode</name>
<value>349CF0YO122</value>
</outbound-parameter>
</flow-call>
The schedule.xhtml page displays a hello message based on the
received parameters and a form that allows to the player to enter the day and
hour when he is available for playing the first match, as shown in the
following code:
<h:body>
First page in the 'schedule' flow
In flow ? #{null !=
facesContext.application.flowHandler.currentFlow}
Flow Id:
#{facesContext.application.flowHandler.currentFlow.id}
Hello, #{flowScope.name} #{flowScope.surname} (#{scheduleBean.regcode})
<h:form>
Day: <h:inputText
value="#{scheduleBean.day}"/>
Starting At Hour: <h:inputText value="#{scheduleBean.hourstart}"/>
<h:commandButton value="Save"
action="success"/>
</h:form>
</h:body>
Notice that the name and surname are obtained
from the flow scope using the flowScope object, while the registration code is
obtained from the flow scoped ScheduleBean; this bean stores the day, hour (received
from the player), and registration code (received from the registration flow).
Each piece of
information received from the registration
bean was guided to the place of storage using the <inbound-parameter> tag in the schedule-flow.xml file, as shown in the following code:
<flow-definition
id="schedule">
<view id="schedule">
<vdl-document>/schedule/schedule.xhtml</vdl-document>
</view>
<inbound-parameter>
<name>playernameparam</name>
<value>#{flowScope.name}</value>
</inbound-parameter>
<inbound-parameter>
<name>playersurnameparam</name>
<value>#{flowScope.surname}</value>
</inbound-parameter>
<inbound-parameter>
<name>playerregistrationcode</name>
<value>#{scheduleBean.regcode}</value>
</inbound-parameter>
</flow-definition>
After the day and hour are inserted, the
button labeled Save
should save the data and navigate to the success.xhtml page, which is a simple page that displays all
data provided by the player. From this page, we can return to the calling flow,
registration,
via a simple button labeled Exit Registration, as shown in the following code:
<h:body>
Second page in the 'schedule' flow
In flow ? #{null !=
facesContext.application.flowHandler.currentFlow}
Flow Id:
#{facesContext.application.flowHandler.currentFlow.id}
You are registered as #{flowScope.name}
#{flowScope.surname} (#{scheduleBean.regcode})
You will play first match #{scheduleBean.day}
after #{scheduleBean.hourstart}
<h:button value="Exit
Registration" outcome="taskFlowReturnThanks"/>
</h:body>
The outcome, taskFlowReturnThanks, is defined in the schedule-flow.xml file as follows:
<flow-return
id="taskFlowReturnThanks">
<from-outcome>/registration/thanks.xhtml</from-outcome>
</flow-return>
The thanks.xhtml page is just a final step before the user
exists from the registration flow, as shown in the following code:
<h:body>
Third page in the 'registration' flow
In flow ? #{null != facesContext.application.flowHandler.currentFlow}
Flow Id:
#{facesContext.application.flowHandler.currentFlow.id}
Thanks for your patience, Mr
:#{registrationBean.playerName}
#{registrationBean.playerSurname}
We wish you beautiful games!
<h:button value="Bye Bye,
#{registrationBean.playerSurname}" outcome="taskFlowReturnDone"/>
</h:body>
If you want to jump over the thanks.xhtml page, directly outside of both flows, then
you can define the flow return, taskFlowReturnThanks, to point out the done.xhtml page, which is returned by the calling flow
via the taskFlowReturnDone flow return. Therefore, we can use the
following code:
<flow-return
id="taskFlowReturnThanks">
<from-outcome>taskFlowReturnDone</from-outcome>
Configuring
flows programmatically
In all the previous examples, you saw how to
configure a flow using the declarative approach. But, flows can be configured
programmatically also. The steps for configuring a flow programmatically are as
follows:
1. Create a class and name it as the flow. This
is more like a convention, not a requirement!
2.
In this class, write a method as shown
in the following code; the @FlowDefinition annotation is a class-level annotation that
allows the flow definition to be defined using the FlowBuilder API. The name of this method can be any valid
name, but defineFlow is like a convention. So, the name defineFlow is not mandatory, and you can even define
more flows in the same class as long as you have annotated them correctly.
@Produces
@FlowDefinition
public
Flow defineFlow(@FlowBuilderParameter FlowBuilder flowBuilder) {
...
}
3.
Use the FlowBuilder API to configure the flow.
Using the FlowBuilder API is pretty straightforward and intuitive.
For example, you can write the registration-flow.xml file programmatically, as follows:
public
class Registration implements Serializable {
@Produces
@FlowDefinition
public Flow defineFlow(@FlowBuilderParameter
FlowBuilder flowBuilder) {
String flowId = "registration";
flowBuilder.id("", flowId);
flowBuilder.viewNode(flowId, "/" +
flowId + "/" + flowId + ".xhtml").markAsStartNode();
flowBuilder.viewNode("confirm-id",
"/" + flowId + "/confirm.xhtml");
flowBuilder.viewNode("thanks-id",
"/" + flowId + "/thanks.xhtml");
flowBuilder.returnNode("taskFlowReturnIndex").fromOutcome("/index");
flowBuilder.returnNode("taskFlowReturnDone").fromOutcome("#{registrationBean.returnValue}");
flowBuilder.flowCallNode("callSchedule").flowReference("",
"schedule").
outboundParameter("playernameparam","#{registrationBean.playerName}").
outboundParameter("playersurnameparam","#{registrationBean.playerSurname}").
outboundParameter("playerregistrationcode",
"349CF0YO122");
return flowBuilder.getFlow();
}
}
As you can see, for each tag used in the
declarative approach, there is a corresponding method in the FlowBuilder API. For example, the flowBuilder.id method accepts two arguments: the first one
represents the document ID (usually, an empty space), and the second one
represents the flow ID.
The schedule-flow.xml file can be programmatically translated as
shown in the following code:
public
class Schedule implements Serializable {
@Produces
@FlowDefinition
public Flow defineFlow(@FlowBuilderParameter
FlowBuilder flowBuilder) {
String flowId = "schedule";
flowBuilder.id("", flowId);
flowBuilder.viewNode(flowId, "/" +
flowId + "/" + flowId + ".xhtml").markAsStartNode();
flowBuilder.viewNode("success-id",
"/" + flowId + "/success.xhtml");
flowBuilder.returnNode("taskFlowReturnThanks").fromOutcome("/registration/thanks.xhtml");
flowBuilder.inboundParameter("playernameparam",
"#{flowScope.name}");
flowBuilder.inboundParameter("playersurnameparam",
"#{flowScope.surname}");
flowBuilder.inboundParameter("playerregistrationcode","#{scheduleBean.regcode}");
return flowBuilder.getFlow();
}
}
! A method
annotated with @PostConstruct will be called when the application enters
into the current flow and the flow scoped bean is instantiated, while
subsequent requests will use this instance until the flow is dumped. This is repeated if the
application enters in this flow again. So, initializations specific to the
current flow can be placed here.
The complete application is available here.
! Declarative and
programmatic configurations can be mixed in the same application. You can see
such an application in Mastering
JavaServer Faces 2.2 book.
Flows
and navigation cases
Navigation cases can be used for navigating
inside flows. At this moment, when you click on the button labeled Register
To Tournament, the flow goes
in the confirm.xhtml page based on implicit navigation. But we can
easily exemplify an explicit navigation in the flow by replacing the value of
the action attribute as
follows:
<h:commandButton
value="Register To Tournament" action="confirm_outcome"/>
Now, confirm_outcome cannot be automatically fetched to the confirm.xhtml page; therefore, in the registration-flow.xml file, we can add an explicit navigation case,
as shown in the following code:
<navigation-rule>
<from-view-id>/registration/registration.xhtml</from-view-id>
<navigation-case>
<from-outcome>confirm_outcome</from-outcome>
<to-view-id>/registration/confirm.xhtml</to-view-id>
<redirect/>
</navigation-case>
</navigation-rule>
You can see such an application in Mastering
JavaServer Faces 2.2 book.
! When you need to
use a navigation case to enter in a flow, you will have to specify the <to-flow-document-id>document_ID</toflow-document-id> statement nested in the <navigation-case> tag. If there is no document ID, that uses <to-flow-document-id/>. Moreover a <h:button> (or <h:link>) can be used to enter in such a flow, as
follows:
<h:button
id="..." value="enter flow"
outcome="flow">
<f:attribute
name="to-flow-document-id" value="unique"/>
</h:button>
If you choose to write a programmatic
navigation case, then JSF 2.2 comes with a method named, getToFlowDocumentId(), which should be overridden for indicating
the document ID.
In order to accomplish the same thing in a
programmatic fashion, you need to use the NavigationCaseBuilder API, as shown in the following code; this is
the same navigation case, so we have used only the needed methods:
flowBuilder.navigationCase().fromViewId("/registration/registration.xhtml").
fromOutcome("confirm_outcome").toViewId("/registration/confirm.xhtml").redirect();
You can see such an application in Mastering
JavaServer Faces 2.2 book.
Moreover, you can even use a custom navigation
handler. The new NavigationHandlerWrapper class (added in JSF 2.2) provides a simple implementation
of the NavigationHandler class. Therefore, we can easily extend it to
prove a navigation case using a custom navigation handler, as shown in the
following code:
public
class CustomNavigationHandler extends NavigationHandlerWrapper {
private NavigationHandler
configurableNavigationHandler;
public CustomNavigationHandler() {}
public
CustomNavigationHandler(NavigationHandler configurableNavigationHandler){
this.configurableNavigationHandler =
configurableNavigationHandler;
}
@Override
public void handleNavigation(FacesContext
context,String fromAction, String outcome){
if
(outcome.equals("confirm_outcome")) {
outcome = "confirm";
}
getWrapped().handleNavigation(context,
fromAction, outcome);
}
@Override
public NavigationHandler getWrapped() {
return configurableNavigationHandler;
}
}
Finally, a quick configuration in the
faces-config.xml file is as follows:
<application>
<navigation-handler>
beans.CustomNavigationHandler
</navigation-handler>
</application>
When the flow has a document ID, you need to
override the handleNavigation(FacesContext
context, String fromAction, String outcome, String toFlowDocumentId) method.
You can see such an application in Mastering
JavaServer Faces 2.2 book.
Inspecting
flow navigation cases
Whatever approach you choose for using
navigation cases inside flows, you can always inspect them via the ConfigurableNavigationHandler.inspectFlow() method. This method is invoked by the flow
system to cause the flow to be inspected for navigation rules. You can easily
override it to obtain information about navigation cases, by writing a custom
configurable navigation handler. The easiest way to accomplish this is to
extend the new ConfigurableNavigationHandlerWrapper
class (introduced in JSF 2.2), which
represents a simple implementation of ConfigurableNavigationHandler. For example, the following snippet of code
sends in log information about each found navigation case:
public
class CustomConfigurableNavigationHandler extends
ConfigurableNavigationHandlerWrapper
{
private final static Logger logger =
Logger.getLogger(CustomConfigurableNavigationHandler.class.getName());
private ConfigurableNavigationHandler configurableNavigationHandler;
public CustomConfigurableNavigationHandler()
{}
public CustomConfigurableNavigationHandler (ConfigurableNavigationHandler
configurableNavigationHandler){
this.configurableNavigationHandler = configurableNavigationHandler;
}
@Override
public void inspectFlow(FacesContext context,
Flow flow) {
getWrapped().inspectFlow(context, flow);
if (flow.getNavigationCases().size() > 0)
{
Map<String,
Set<NavigationCase>> navigationCases = flow.getNavigationCases();
for (Map.Entry<String,
Set<NavigationCase>> entry: navigationCases.entrySet()) {
logger.log(Level.INFO,
"Navigation case: {0}", entry.getKey());
for (NavigationCase nc :
entry.getValue()) {
logger.log(Level.INFO,
"From view id: {0}", nc.getFromViewId());
logger.log(Level.INFO,
"From outcome: {0}", nc.getFromOutcome());
logger.log(Level.INFO, "To
view id: {0}", nc.getToViewId(context));
logger.log(Level.INFO,
"Redirect: {0}", nc.isRedirect());
}
}
}
}
@Override
public ConfigurableNavigationHandler
getWrapped() {
return configurableNavigationHandler;
}
}
If you attach this custom configurable
navigation handler to one of the preceding three examples, then you will get
information about the presented navigation case. You can see such an
application in Mastering
JavaServer Faces 2.2 book.
Using
the initializer and finalizer
By using the FlowBuilder API, we can attach callback methods that will
be automatically called when a flow is created and right before it is
destroyed. The FlowBuilder.initializer() method has the following signatures, which are
called when the flow is created:
public
abstract FlowBuilder initializer(String methodExpression)
public
abstract FlowBuilder initializer(javax.el.MethodExpression methodExpression)
The FlowBuilder.finalizer() signature is called before the flow is
destroyed, as follows:
public
abstract FlowBuilder finalizer(String methodExpression)
public
abstract FlowBuilder finalizer(javax.el.MethodExpression methodExpression)
For example, the initializer method can be
used to pass external parameters into a flow. Let's suppose that in the index.xhtml page (outside the flow), when we click on the button labeled Start
Registration, we want to pass
the tournament name and place into the flow, as follows:
<h:form>
<h:inputHidden
id="tournamentNameId" value="Roland Garros"/>
<h:inputHidden
id="tournamentPlaceId" value="France"/>
<h:commandButton value="Start
Registration" action="registration"/>
</h:form>
These two parameters must be available when
the flow starts, because the wrapped information is displayed in the registration.xhml page (the start node of the flow) via two
properties from RegistrationBean, namely tournamentName and tournamentPlace. For this, we need to call a method from RegistrationBean capable of extracting this information and
store it in these two properties, as shown in the following code:
//initializer
method
public
void tournamentInitialize() {
tournamentName = FacesContext.getCurrentInstance().
getExternalContext().getRequestParameterMap().get("tournamentNameId");
tournamentPlace =
FacesContext.getCurrentInstance().
getExternalContext().getRequestParameterMap().get("tournamentPlaceId");
}
Now is the interesting part, because we can
use the initializer method to indicate the tournamentInitialize() method as the callback method that should be invoked
when the flow is created. This can be done in the registration-flow.xml file as
follows:
<initializer>
#{registrationBean.tournamentInitialize()}
</initializer>
So, at this moment, we can use the tournament
name and place right from the beginning of the flow and during the flow's
lifespan. Going further, another simple scenario can be the justification for
using a finalizer method. Let's suppose that we count the registered players
via an application scoped bean named PlayersCounterBean, as shown in the following code:
@Named
@ApplicationScoped
public
class PlayersCounterBean implements Serializable {
private int count = 0;
public int getCount() {
return count;
}
public void addPlayer() {
count++;
}
}
The count variable should be increased when the player
exits the flow, and the registration is successfully done; therefore, we can
place a finalizer method in the registration-flow.xml file as follows:
<finalizer>
#{registrationBean.tournamentFinalize()}
</finalizer>
The tournamentFinalize() method is implemented in RegistrationBean, as shown in the following code:
@Named
@FlowScoped(value
= "registration")
public
class RegistrationBean implements Serializable {
@Inject
private PlayersCounterBean playersCounterBean;
...
//finalizer method
public void tournamentFinalize() {
playersCounterBean.addPlayer();
}
}
Since the PlayersCounterBean is an application bean, we can use its
goodies outside the flow. The complete application can be found here.
The same output can be programmatically
achieved using the following code:
flowBuilder.initializer("#{registrationBean.
tournamentInitialize(param['tournamentNameId'],
param['tournamentPlaceId'])}");
flowBuilder.finalizer("#{registrationBean.tournamentFinalize()}");
For the sake of variation, in this case we
didn't extract the parameter values using the request parameter Map. We preferred to use the implicit object param and to pass the values as arguments of the tournamentInitialize() method as follows:
//initializer
method
public
void tournamentInitialize(String tn, String tp) {
tournamentName = tn;
tournamentPlace = tp;
}
You can see such an application in Mastering
JavaServer Faces 2.2 book.
Using
the flow switch
The switch case statements are a substitute for long if statements and are useful to do conditional
outcome mapping. In order to see it at work, we can suppose that for each
tournament we have a separate confirm.xhtml page. Let's have the four grand slams in
tennis and the associated XHTML confirmation pages, as follows:
• Roland Garros and confirm_rg.xhtml
• Wimbledon and confirm_wb.xhtml
• US Open and confirm_us.xhtml
• Australian Open and confirm_ao.xhtml
The name and place of the tournament are
passed in the flow via a simple form (one form per tournament), as follows (you
already know from the preceding section how this information may be obtained
inside the flow):
<h:form>
<h:inputHidden
id="tournamentNameId" value="Australian Open"/>
<h:inputHidden
id="tournamentPlaceId" value="Australia"/>
<h:commandButton value="Start
Registration (Australian Open)" action="registration"/>
</h:form>
Now, after clicking on the button labeled Register
To..., we need to choose the right confirmation
page. For this, we can use a programmatic switch, as shown in the following
code:
public
class Registration implements Serializable {
@Produces
@FlowDefinition
public Flow defineFlow(@FlowBuilderParameter
FlowBuilder flowBuilder) {
String
flowId = "registration";
flowBuilder.id("",
flowId);
flowBuilder.viewNode(flowId,
"/" + flowId + "/" + flowId + ".xhtml").markAsStartNode();
flowBuilder.viewNode("no-tournament-id",
"/" + flowId + "/notournament.xhtml");
flowBuilder.viewNode("confirm-rg-id",
"/" + flowId + "/confirm_rg.xhtml");
flowBuilder.viewNode("confirm-wb-id",
"/" + flowId + "/confirm_wb.xhtml");
flowBuilder.viewNode("confirm-us-id",
"/" + flowId + "/confirm_us.xhtml");
flowBuilder.viewNode("confirm-ao-id",
"/" + flowId + "/confirm_ao.xhtml");
flowBuilder.returnNode("taskFlowReturnDone").fromOutcome("#{registrationBean.returnValue}");
flowBuilder.switchNode("confirm-switch-id").
defaultOutcome("no-tournament-id").
switchCase().condition("#{registrationBean.tournamentName
eq
'Roland
Garros'}").fromOutcome("confirm-rg-id").
condition("#{registrationBean.tournamentName
eq
'Wimbledon'}").fromOutcome("confirm-wb-id").
condition("#{registrationBean.tournamentName
eq 'US
Open'}").fromOutcome("confirm-us-id").
condition("#{registrationBean.tournamentName
eq 'Australian
Open'}").fromOutcome("confirm-ao-id");
flowBuilder.initializer("#{registrationBean.
tournamentInitialize(param['tournamentNameId'],
param['tournamentPlaceId'])}");
flowBuilder.finalizer("#{registrationBean.
tournamentFinalize()}");
return
flowBuilder.getFlow();
}
}
Notice that when no condition is evaluated to true, the selected node will be the notournament.xhtml page, which represents the default outcome.
This is just a simple XHMTL page containing some specific text.
You can see such an application in Mastering
JavaServer Faces 2.2 book.
Declaratively, this can be achieved in the registration-flow.xml file as shown in the following code. You can
use <view>
tags to hide the outcome's path behind some IDs (map outcomes to pages), as we
saw in the programmatic example:
<switch
id="confirm-switch-id">
<default-outcome>
/registration/notournament.xhtml
</default-outcome>
<case>
<if>#{registrationBean.tournamentName
eq 'Roland Garros'}</if>
<from-outcome>/registration/confirm_rg.xhtml</from-outcome>
</case>
<case>
<if>#{registrationBean.tournamentName
eq 'Wimbledon'}</if>
<from-outcome>/registration/confirm_wb.xhtml</from-outcome>
</case>
<case>
<if>#{registrationBean.tournamentName
eq 'US Open'}</if>
<from-outcome>/registration/confirm_us.xhtml</from-outcome>
</case>
<case>
<if>#{registrationBean.tournamentName
eq 'Australian Open'}</if>
<from-outcome>/registration/confirm_ao.xhtml</from-outcome>
</case>
</switch>
So, switch can be useful when you don't want
to map each outcome to a single page.
Packaging
flows
Flows act as logical units of work; therefore,
they are portable across multiple applications. The portability is obtained by
packaging the flow artifacts in a JAR file. Further, the JAR file can be added
in any application CLASSPATH and the flow is ready to be used. To package
a flow, you need to follow some conventions, which are listed as follows:
1. Explicitly define the flows in the faces-config.xml file.
2. In the JAR root, create a META-INF folder.
3. Add the faces-config.xml file in this folder.
4. Add the beans.xml file in this folder.
5. In the same folder, META-INF, create a subfolder named flows.
6. In the flows folder, add all nodes (pages) of the flow.
7. In the JAR root, outside the META-INF folder, add all the Java code (classes) needed
by the flow.
Based on the preceding steps, the flow
described in the Flows with beans
section can be packaged in a JAR file named registration.jar, as shown in the following screenshot:

You can see such an application in Mastering
JavaServer Faces 2.2 book.
Programmatic
flow scope
Programmatically speaking, the flow scope can
be accessed via the javax.faces.flow.FlowHandler class. After obtaining a FlowHandler class's object, you can easily access the
current flow, add a new flow, and manipulate the flow map represented by #{flowScope}, as follows:
FacesContext
context = FacesContext.getCurrentInstance();
Application
application = context.getApplication();
FlowHandler
flowHandler = application.getFlowHandler();
//get
current flow
Flow
flow = flowHandler.getCurrentFlow();
Flow
flowContext = flowHandler.getCurrentFlow(context);
//add
flow
flowHandler.addFlow(context,
flow);
//get
access to the Map that backs #{flowScope}
Map<Object,Object>
flowMap = flowHandler.getCurrentFlowScope();
Obviously, the FlowHandler class is the most important class involved in
the interaction between runtime and the faces flow feature. This is an abstract class that can be extended to provide a
custom flow handler implementation. In order to do that, you can start by
creating a new FlowHandlerFactory class, which is used by the Application class to create the singleton instance of the
FlowHandler class. This class
has a simple implementation named FlowHandlerFactoryWrapper, which can be easily extended to return a
custom flow handler, as shown in the following code:
public
class CustomFlowHandlerFactory extends FlowHandlerFactoryWrapper {
private FlowHandlerFactory flowHandlerFactory;
public CustomFlowHandlerFactory(){}
public
CustomFlowHandlerFactory(FlowHandlerFactory flowHandlerFactory){
this.flowHandlerFactory = flowHandlerFactory;
}
@Override
public FlowHandler createFlowHandler(FacesContext
context){
FlowHandler customFlowHandler = new CustomFlowHandler(getWrapped().createFlowHandler(context));
return customFlowHandler;
}
@Override
public FlowHandlerFactory getWrapped() {
return this.flowHandlerFactory;
}
}
This factory should be configured in the
faces-config.xml file, as shown in the following code:
<factory>
<flow-handler-factory>
beans.CustomFlowHandlerFactory
</flow-handler-factory>
</factory>
Further, the CustomFlowHandler class represents an extension of the FlowHandler class. Since the FlowHandler class is an abstract class, you need to provide an implementation
for each of its methods, as shown in the following code:
public
class CustomFlowHandler extends FlowHandler {
private FlowHandler flowHandler;
public CustomFlowHandler() {}
public CustomFlowHandler(FlowHandler
flowHandler) {
this.flowHandler = flowHandler;
}
...
//Overrided methods
...
}
For example, you know from the previous
sections that the registration flow passed several outbound parameters to the
nested schedule flow. You saw how to accomplish that declaratively, in the registration-flow.xml file, and programmatically, via the FlowBuilder API, in the Registration class. You can do the same thing from a
custom flow handler in the method named, transition(), which is capable to perform a transition
between a source flow (for example, registration) and a target flow (for example, schedule). When the registration flow calls the
schedule flow, you can write the following code:
@Override
public
void transition(FacesContext context, Flow sourceFlow,
Flow targetFlow, FlowCallNode
outboundCallNode, String toViewId) {
if ((sourceFlow != null) &&
(targetFlow != null)) {
if ((sourceFlow.getStartNodeId().equals("registration"))
&&
(targetFlow.getStartNodeId().equals("schedule")))
{
FlowCallNode flowCallNode = sourceFlow.getFlowCalls().get("callSchedule");
Map<String, Parameter>
outboundParameters = flowCallNode.getOutboundParameters();
CustomParameter playernameparamO =
new CustomParameter("playernameparam", "#{registrationBean.playerName}");
CustomParameter playersurnameparamO
= new CustomParameter("playersurnameparam", "#{registrationBean.playerSurname}");
CustomParameter playerregistrationcodeO
= new CustomParameter("playerregistrationcode", "349CF0YO122");
outboundParameters.put("playernameparam",
playernameparamO);
outboundParameters.put("playersurnameparam",
playersurnameparamO);
outboundParameters.put("playerregistrationcode",
playerregistrationcodeO);
}
}
flowHandler.transition(context, sourceFlow,
targetFlow,
outboundCallNode, toViewId);
}
The target inbound parameters can be accessed
as follows (the Map
parameter cannot be altered):
Map<String,
Parameter> inboundParameters = targetFlow.getInboundParameters();
Flow parameters are represented by the javax.faces.flow.Parameter abstract class. The CustomParameter class provides an implementation as follows:
public
class CustomParameter extends Parameter {
private String name;
private String value;
public CustomParameter(String name, String
value) {
this.name = name;
this.value = value;
}
@Override
public String getName() {
return name;
}
@Override
public ValueExpression getValue() {
return createValueExpression(value,
String.class);
}
private ValueExpression
createValueExpression(String exp, Class<?> cls) {
FacesContext facesContext =
FacesContext.getCurrentInstance();
ELContext elContext =
facesContext.getELContext();
return
facesContext.getApplication().getExpressionFactory().
createValueExpression(elContext,
exp, cls);
}
 <h:inputText/>
  JSF 2 Tutorials at www.mkyong.com
  JavaServer Faces (JSF) Tutorial


Niciun comentariu :
Trimiteți un comentariu