The DeltaSpike (grouped) conversations boost CDI conversation scope
If
you are familiar with
CDI
conversation scope, then you will quickly adopt the
DeltaSpike (grouped) conversations. DeltaSpike provides a very flexible and powerful
conversational mechanism for CDI beans. In this post you will see several
didactical examples meant to expose this mechanism. Basically, we will cover
the follosing topic:
1.
"Isolated" DeltaSpike Conversations
a. Conversation with a single bean
("isolated" conversation)
b. Parallel
"isolated" conversations
c. Stopping "isolated"
conversations control from interface
d. "Isolated" conversations
injection
i. Injecting conversation ConversationBeanA in ConversationBeanB and vice
versa
ii.Injecting a conversation bean in
non-conversation bean (e.g. a view scoped bean)
2.
Grouped DeltaSpike Conversations (logical group of beans)
a. Grouped Conversation Scoped Beans
b. Closing a conversation group from
outside group
c. Closing all conversation groups
d. Grouped conversations injection
i. Injecting conversation group AB in CD and vice versa
ii.Injecting
conversation group AB in a
non-conversation bean (e.g. a view scoped bean)
3.
Sub-Conversation-Groups
a. Listing
beans of a sub-group
i. Explicitly Listing Beans of a sub-group
via #subGroup/#of
ii.Using implicit sub-group
b. Closing sub-groups
Prerequisites
Before
seeing the examples it is important to keep in mind the following coordinates:
-
DeltaSpike conversations are based on the
window-scope (as a
consequence of this, do not forget to add the
ds:windowId (
xmlns:ds="http://deltaspike.apache.org/jsf")
component).
-
DeltaSpike starts (grouped) conversations automatically as soon as you access
conversation scoped beans.
-
You can inject the conversation via @Inject and use it to terminate the
conversation immediately . The invocation of GroupedConversation#close() leads to
an immediate termination of the conversation.
-
You can inject the GroupedConversationManager which can
be used to terminate a given conversation (group) by invoking, GroupedConversationManager#closeConversationGroup().
-
You can inject the GroupedConversationManager which can
be used to terminate all conversations (groups) by invoking, GroupedConversationManager#closeConversations().
-
All conversations within a window are closed automatically, once WindowContext#closeWindow() gets
called for the window.
-
DeltaSpike conversations get closed/restarted immediately instead of keeping
them until the end of the request like standard conversations do, because the
behavior of standard conversations breaks a lot of use-cases. However, if you
really need to keep them until the end of the request, you can close them in a @PostRenderView callback.
-
DeltaSpike conversations are available for CDI managed beans, therefore after
adding @Named (javax.inject.Named) to
beans.
1. "Isolated"
DeltaSpike Conversations
In
CDI and DeltaSpike, the conversation scope allows developers to demarcate the
lifespan of the session scope. In CDI, there is just one big conversation which
contains all conversation scoped beans. This is not true for DeltaSpike,
because DeltaSpike supports parallel "isolated"
conversations. By default, every conversation scoped bean exists in an
"isolated" conversation. That means there are several parallel
conversations within the same window. For example, you can have in the same
window multiple hangouts, and each hangout to belong to a conversation. By
default, closing a conversation will not close others conversations (hangouts).
Moreover, conversations can "interact" via CDI injection (@Inject). Closing
a conversation will close the corresponding bean, but will not close the bean
that have been injected from other conversation. With other words, separated
conversations runs "isolated", and their lifespan vary depending on
application flow (e.g. user interactions). They can "interact" for a
common goal, can be started/stopped separately or together (ones or multiple
times), can be injected in other conversations or even in beans that don't
belong to any conversation, etc.
a. Conversation
with a single bean ("isolated" conversation)
A
CDI managed bean represents the unit of work for a conversation. A single CDI
managed bean defines (characterizes) a single conversation if it is annotated
with @Named and @GroupedConversationScoped (exposes
the org.apache.deltaspike.core.api.scope.GroupedConversationScoped class). In
such cases, DeltaSpike uses the class of the bean as conversation group; we can
say that we have a conversation group with a single bean. Conversation groups
are discussed a little bit later.
In
the below image, we have a bean that belongs to a conversation (the blue disc)
with local closing capability (the small red disc, up-right side) and some
other beans in application that don't belong to any conversation (the green discs
with X):
For
example, the below bean represents a single conversation:
import
java.io.Serializable;
import
javax.inject.Inject;
import
javax.inject.Named;
import
org.apache.deltaspike.core.api.scope.GroupedConversation;
import
org.apache.deltaspike.core.api.scope.GroupedConversationScoped;
@Named
@GroupedConversationScoped
public class
ConversationBeanA implements Serializable {
@Inject
private GroupedConversation conversation;
private int A;
public ConversationBeanA() {
A = 0;
}
public void increaseA() {
A++;
if (A == 4) {
finish();
}
}
private void finish() {
this.conversation.close();
}
public int getA() {
return A;
}
public void setA(int A) {
this.A = A;
}
}
The
integer A will be
increased until it reach the value, 4. When this will happen the conversation
is stopped (closed) and restarted - in the same request, the finish() and ConversationBeanA
constructor are called. Pressing again the Increase A button will use the new conversation,
for which integer A is 0
again:
<h:commandButton
value="Increase A"
action="#{conversationBeanA.increaseA()}"/>
The
complete application is available
here
(
DSGroupedConversationScoped_0).
b. Parallel "isolated"
conversations
In
the above example, we have a single conversation with a single bean. We can
have in the same time multiple "isolated" conversations in the same
window.
In
the below image, we have two beans that belongs to two different (parallel) conversations
(the blue discs) with local closing capability (the small red discs, up-right
side) and some other beans in application that don't belong to any conversation
(the green discs with X):
For
example, let's add one more bean with its own conversation. This time the bean
is named, ConversationBeanB, and is
pretty similar with the ConversationBeanA:
import
java.io.Serializable;
import
javax.inject.Inject;
import
javax.inject.Named;
import org.apache.deltaspike.core.api.scope.GroupedConversation;
import
org.apache.deltaspike.core.api.scope.GroupedConversationScoped;
@Named
@GroupedConversationScoped
public class
ConversationBeanB implements Serializable {
@Inject
private GroupedConversation conversation;
private int B;
public ConversationBeanB() {
B = 0;
}
public void increaseB() {
B++;
if (B
== 7) {
finish();
}
}
private void finish() {
this.conversation.close();
}
public int getB() {
return B;
}
public void setB(int B) {
this.B
= B;
}
}
The
integer B will be
increased until it reach the value, 7. When this will happen the conversation
is stopped and restarted. Pressing again the Increase B button will use the new conversation,
for which integer B is 0
again. In parallel with this conversation, we have the ConversationBeanA which controls the integer A. Each
conversation work and act separately:
<h:commandButton
value="Increase A"
action="#{conversationBeanA.increaseA()}"/>
<h:commandButton
value="Increase B" action="#{conversationBeanB.increaseB()}"/>
The
complete application is available
here
(
DSGroupedConversationScoped_I).
c. Stopping "isolated"
conversations control from interface
In
the above example, the conversations are stopped by internal conditions nested
in managed beans. But, you can allow the user to stop the conversations, by
providing the proper controls to him. Just provide him a control (e.g. command
button) and invoke the finish() method
(ensure that you provide this method public):
public void
finish() {
this.conversation.close();
}
<h:commandButton
value="Increase A"
action="#{conversationBeanA.increaseA()}"/>
<h:commandButton value="Stop
A" action="#{conversationBeanA.finish()}"/>
<h:commandButton
value="Increase B" action="#{conversationBeanB.increaseB()}"/>
<h:commandButton value="Stop
B" action="#{conversationBeanB.finish()}"/>
Notice
that in the below screenshot we have increased integers A and B beyond
the limits established in the previous example (4 and 7). This time the
conversations can be stopped from user interface via two buttons:
Of
course, you can find other ways to close conversations also. The main idea is
that DeltaSpike conversations can be stopped by users or conditionally,
depending on your implementation. By the other hand, DeltaSpike will start them
automatically for you, and will stop them also automatically once the WindowContext#closeWindow() gets
called for the window.
The
complete application is available
here
(
DSGroupedConversationScoped_II).
d. "Isolated"
conversations injection
Now,
you are familiar with our two isolated conversations (ConversationBeanA and ConversationBeanB).
i. Injecting conversation ConversationBeanA in ConversationBeanB
and vice versa
Further, let's use the CDI @Inject to inject
an instance of conversation ConversationBeanA in ConversationBeanB, and vice versa.
Based
on this injections we will calculate the sum of
A and B integers
(A + B). So, the
ConversationBeanA
become:
@Named
@GroupedConversationScoped
public class
ConversationBeanA implements Serializable {
@Inject
private GroupedConversation conversation;
@Inject
private ConversationBeanB ConversationBeanb;
private int A;
public ConversationBeanA() {
A = 0;
}
public void increaseA() {
A++;
}
public void increaseAWithB(){
A+=ConversationBeanb.getB();
}
public void finish() {
this.conversation.close();
}
public int getA() {
return
A;
}
public void setA(int A) {
this.A = A;
}
}
And
the ConversationBeanB
become:
@Named
@GroupedConversationScoped
public class
ConversationBeanB implements Serializable {
@Inject
private GroupedConversation conversation;
@Inject
private ConversationBeanA ConversationBeana;
private int B;
public ConversationBeanB() {
B = 0;
}
public void increaseB() {
B++;
}
public void increaseBWithA(){
B+=ConversationBeana.getA();
}
public void finish() {
this.conversation.close();
}
public int getB() {
return B;
}
public void setB(int B) {
this.B = B;
}
}
And
the Facelets simple expose the arithmetic operation (A+B):
<h:commandButton
value="Increase A"
action="#{conversationBeanA.increaseA()}"/>
<h:commandButton
value="Stop A" action="#{conversationBeanA.finish()}"/>
<h:commandButton
value="Increase A with B" action="#{conversationBeanA.increaseAWithB()}"/>
<h:commandButton
value="Increase B"
action="#{conversationBeanB.increaseB()}"/>
<h:commandButton
value="Stop B" action="#{conversationBeanB.finish()}"/>
<h:commandButton
value="Increase B with A"
action="#{conversationBeanB.increaseBWithA()}"/>
Each
time you press the Increase
A with B (or Increase
B with A) button the sum will be the current value of A + the
current value of B
obtained
via getA() and getB(). If you
stop ConversationBeanA, then A will be
0. If you stop ConversationBeanB, then B will be
0.
The
complete application is available
here
(
DSGroupedConversationScoped_XII).
ii. Injecting a conversation bean in
non-conversation bean (e.g. a view scoped bean)
Further, let's use the CDI @Inject to inject
an instance of conversation ConversationBeanA in a view scoped bean BeanB. In BeanB, will try
to calculate the sum of A
and B integers.
The
conversation bean is:
@Named
@GroupedConversationScoped
public class
ConversationBeanA implements Serializable {
@Inject
private GroupedConversation conversation;
private int A;
public ConversationBeanA() {
A = 0;
}
public void increaseA() {
A++;
}
public void finish() {
this.conversation.close();
}
public int getA() {
return
A;
}
public void setA(int A) {
this.A = A;
}
}
And,
the BeanB injects ConversationBeanA:
@Named
@ViewScoped
public class
BeanB implements Serializable {
@Inject
private ConversationBeanA ConversationBeana;
private int B;
public BeanB() {
B = 0;
}
public void increaseB() {
B++;
}
public void increaseBWithA() {
B+=ConversationBeana.getA();
}
public int getB() {
return B;
}
public void setB(int B) {
this.B = B;
}
}
And
the Facelets simple expose the arithmetic operation (A+B):
<h:commandButton
value="Increase A"
action="#{conversationBeanA.increaseA()}"/>
<h:commandButton
value="Stop A" action="#{conversationBeanA.finish()}"/>
<h:commandButton
value="Increase B" action="#{beanB.increaseB()}"/>
<h:commandButton
value="Increase B With A"
action="#{beanB.increaseBWithA()}"/>
Each
time you press the Increase
B with A button the sum will be the current value of A + the
current value of B.
If
you stop and restart conversation ConversationBeanA, then A integer will be 0. You can increase A integer anytime
you want.
Note Of
course, you can inject non-conversation beans in conversation beans also.
The
complete application is available
here
(
DSGroupedConversationScoped_X).
2. Grouped DeltaSpike
Conversations (logical group of beans)
By
default, every conversation scoped bean exists in an "isolated"
conversation. That means there are several parallel conversations within the
same window. But, DeltaSpike allows us to create logical group of beans as grouped conversations. For example, you
can have in the same window multiple wizards, and each wizard to belong to a
conversation group. By default, closing a group will not close others groups
(wizards). Moreover, groups can "interact" via CDI injection (@Inject). Closing
a conversation group will close all the beans that belongs to that group, but
will not close the conversation groups that contains beans that have been
injected in the closed conversation group. With other words, grouped
conversations runs "isolated", and their lifespan vary depending on
application flow (e.g. user interactions). They can "interact" for a
common goal, can be started/stopped separately or together (ones or multiple
times), can be injected in other conversation groups or even beans that don't
belong to any conversation group, etc.
a. Grouped
Conversation Scoped Beans
In
order to create a conversation group, we need to define an interface and
annotated the corresponding beans with the @ConversationGroup annotation (this is just a CDI
qualifier). For example, let's add our "isolated" conversations (ConversationBeanA and ConversationBeanB) in the
same conversation group (let's named it, AB).
First,
we define the conversation group interface, as below:
public
interface ConversationABInterface {
// NOPE
}
Further,
we annotate accordingly the two beans. First bean, ConversationBeanA:
@Named
@GroupedConversationScoped
@ConversationGroup(ConversationABInterface.class)
public class
ConversationBeanA implements Serializable {
@Inject
private GroupedConversation conversation;
private int A;
public ConversationBeanA() {
A = 0;
}
public void increaseA() {
A++;
}
public void finish() {
this.conversation.close();
}
public int getA() {
return A;
}
public void setA(int A) {
this.A = A;
}
}
And
second bean, ConversationBeanB:
@Named
@GroupedConversationScoped
@ConversationGroup(ConversationABInterface.class)
public class
ConversationBeanB implements Serializable {
@Inject
private GroupedConversation conversation;
private int B;
public ConversationBeanB() {
B = 0;
}
public void increaseB() {
B++;
}
public void finish() {
this.conversation.close();
}
public int getB() {
return B;
}
public void setB(int B) {
this.B = B;
}
}
Note If you do
not use @ConversationGroup
explicitly, DeltaSpike uses the class of the bean as conversation group.
The
Facelets is very simple:
<h:commandButton
value="Increase A" action="#{conversationBeanA.increaseA()}"/>
<h:commandButton
value=" Stop
conversation group from A"
action="#{conversationBeanA.finish()}"/>
<h:commandButton
value="Increase B"
action="#{conversationBeanB.increaseB()}"/>
<h:commandButton
value=" Stop
conversation group from B" action="#{conversationBeanB.finish()}"/>
This
time, stopping the conversation group will automatically destroy all the beans
in the group. For example, if you close the conversation group via, ConversationBeanA#finish() then you
will destroy ConversationBeanB also and
vice versa.
The
complete application is available
here
(
DSGroupedConversationScoped_III).
b. Closing a
conversation group from outside group
So,
each bean in a conversation group can call, GroupedConversation#close(). When the
conversation group is closed from any of the containing beans, all beans in
that group conversation will be destroyed. Alternatively, DeltaSpike allows us
to close a conversation group from outside the group. This can be done via, GroupedConversationManager#closeConversationGroup(), as below
(see, OutsideBeanAB request
scoped bean which will close the group conversation created above, AB):
@Named
@RequestScoped
public class
OutsideBeanAB implements Serializable {
@Inject
private GroupedConversationManager
conversationManager;
public void finish() {
this.conversationManager.closeConversationGroup(ConversationABInterface.class);
}
}
In
Facelets, just "attach" a command button to the finish() method:
<h:commandButton
value="Stop conversation group from outside the conversation group"
action="#{outsideBeanAB.finish()}"
style="background-color:
greenyellow;"/>
The
complete application is available
here
(
DSGroupedConversationScoped_V).
c. Closing all
conversation groups
When
you have multiple conversation groups, you can separately close any of the
conversation groups via, GroupedConversationManager#closeConversationGroup().
Alternatively, DeltaSpike allows us to close all conversation groups via, GroupedConversationManager#closeConversations().
In
order to exemplify this case, we define one more conversation group, named CD. This
will contain two beans, ConversationBeanC, and ConversationBeanD.
Basically, these two beans are similar to ConversationBeanA and ConversationBeanB, only
that the incremented integers are named C and D.
Now,
we will have several different points from where we can close the group
conversations, as follows:
-
Each bean calls GroupedConversation#close() - this
will close only the conversation group that contains that bean.
-
Conversation group AB
(containing ConversationBeanA and ConversationBeanB) can be
closed from outside this group via request scoped bean, OutsideBeanAB. This
will not close conversation group, CD.
-
Conversation group CD
(containing ConversationBeanC and ConversationBeanD) can be
closed from outside this group via request scoped bean, OutsideBeanCD. This
will not close conversation group, AB.
-
Close all conversation groups, via request scoped bean CloseAllConversationsBean. This will
close conversation groups AB and CD, and any
other conversation group.
The CloseAllConversationsBean source
code is:
@Named
@RequestScoped
public class
CloseAllConversationsBean implements Serializable {
@Inject
private GroupedConversationManager
conversationManager;
public void finish() {
this.conversationManager.closeConversations();
}
}
In
Facelets, simply define the corresponding buttons:
<h:commandButton
value="Stop conversation group from A"
action="#{conversationBeanA.finish()}"/>
<h:commandButton
value="Stop conversation group from B"
action="#{conversationBeanB.finish()}"/>
<h:commandButton
value="Stop conversation group AB from outside AB"
action="#{outsideBeanAB.finish()}"
style="background-color:
greenyellow;"/>
<h:commandButton
value="Stop conversation group from C"
action="#{conversationBeanC.finish()}"/>
<h:commandButton
value="Stop conversation group from D"
action="#{conversationBeanD.finish()}"/>
<h:commandButton
value="Stop conversation group CD from outside CD"
action="#{outsideBeanCD.finish()}"
style="background-color:
greenyellow;"/>
<h:commandButton value="CLOSE
ALL CONVERSATIONS"
action="#{closeAllConversationsBean.finish()}"
style="background-color: black; color: orange"/>
The
complete application is available
here
(
DSGroupedConversationScoped_VI).
d. Grouped conversations
injection
Now,
you are familiar with our two conversation groups (AB and CD).
Conversation group AB contains ConversationBeanA and ConversationBeanB beans,
and conversation group CD contains ConversationBeanC and ConversationBeanD beans.
i. Injecting conversation group AB in CD and vice
versa
Further, let's use the CDI @Inject to inject
beans of conversation group AB into beans from conversation group CD and vice versa. I choose to inject ConversationBeanA in ConversationBeanC and vice versa, and ConversationBeanB in ConversationBeanD and vice
versa. You can use any other combination, and you don't have to inject all beans of a conversation group!
In
order to inject a bean that belongs to a conversation group into a bean that
belongs to another conversation group, you need to use @Inject and @ConversationGroup
qualifier. In order to test our injections, let's compute A+C integers
and B+D integers.
The corresponding methods have been highlighted below:
·
ConversationBeanA
injects
ConversationBeanC
@Named
@GroupedConversationScoped
@ConversationGroup(ConversationABInterface.class)
public class
ConversationBeanA implements Serializable {
@Inject
private GroupedConversation conversation;
@Inject @ConversationGroup(ConversationCDInterface.class)
private ConversationBeanC ConversationBeanc;
private int A;
public ConversationBeanA() {
A = 0;
}
public void increaseA() {
A++;
}
public void increaseAWithC() {
A+=ConversationBeanc.getC();
}
public void finish() {
this.conversation.close();
}
public int getA() {
return A;
}
public void setA(int A) {
this.A = A;
}
}
·
ConversationBeanC
injects
ConversationBeanA
@Named
@GroupedConversationScoped
@ConversationGroup(ConversationCDInterface.class)
public class
ConversationBeanC implements Serializable {
@Inject
private GroupedConversation conversation;
@Inject
@ConversationGroup(ConversationABInterface.class)
private ConversationBeanA ConversationBeana;
private int C;
public ConversationBeanC() {
C = 0;
}
public void increaseC() {
C++;
}
public void increaseCWithA() {
C+=ConversationBeana.getA();
}
public void finish() {
this.conversation.close();
}
public int getC() {
return C;
}
public void setC(int C) {
this.C = C;
}
}
·
ConversationBeanB
injects
ConversationBeanD
@Named
@GroupedConversationScoped
@ConversationGroup(ConversationABInterface.class)
public class
ConversationBeanB implements Serializable {
@Inject
private GroupedConversation conversation;
@Inject
@ConversationGroup(ConversationCDInterface.class)
private ConversationBeanD ConversationBeand;
private int B;
public ConversationBeanB() {
B = 0;
}
public void increaseB() {
B++;
}
public void increaseBWithD() {
B+=ConversationBeand.getD();
}
public void finish() {
this.conversation.close();
}
public int getB() {
return B;
}
public void setB(int B) {
this.B = B;
}
}
·
ConversationBeanD
injects
ConversationBeanB
@Named
@GroupedConversationScoped
@ConversationGroup(ConversationCDInterface.class)
public class
ConversationBeanD implements Serializable {
@Inject
private GroupedConversation conversation;
@Inject
@ConversationGroup(ConversationABInterface.class)
private ConversationBeanB ConversationBeanb;
private int D;
public ConversationBeanD() {
D = 0;
}
public void increaseD() {
D++;
}
public void increaseDWithB() {
D+=ConversationBeanb.getB();
}
public void finish() {
this.conversation.close();
}
public int getD() {
return D;
}
public void setD(int D) {
this.D = D;
}
}
The
Facelets simple expose the usual buttons:
<h:commandButton
value="Increase A With C"
action="#{conversationBeanA.increaseAWithC()}"
style="background-color: yellow;"/>
<h:commandButton
value="Increase B With D"
action="#{conversationBeanB.increaseBWithD()}"
style="background-color: yellow;"/>
The
complete application is available
here
(
DSGroupedConversationScoped_VII).
ii. Injecting conversation group AB in a non-conversation
bean (e.g. a view scoped bean)
Further,
let's use the CDI @Inject to inject
instances of beans from conversation group AB in a view scoped bean BeanC. In this
bean, will try to calculate the sum of A, B and C integers (A+B+C).
The
BeanC uses @Inject and @ConversationGroup CDI qualifier
to indicate the beans to inject. You can inject beans from different groups
also. As long as you control the behavior, you can "play" with many
kind of injection designs:
@Named
@ViewScoped
public class
BeanC implements Serializable {
private int C;
@Inject
@ConversationGroup(ConversationABInterface.class)
private ConversationBeanA ConversationBeana;
@Inject
@ConversationGroup(ConversationABInterface.class)
private ConversationBeanB ConversationBeanb;
public BeanC() {
C = 0;
}
public void increaseC() {
C++;
}
public void increaseCWithAandB() {
C += ConversationBeana.getA() + ConversationBeanb.getB();
}
public int getC() {
return C;
}
public void setC(int C) {
this.C = C;
}
}
The
Facelets simple expose the usual buttons:
<h:commandButton
value="Increase C With A and B"
action="#{beanC.increaseCWithAandB()}" style="background-color:
yellow;"/>
Note You can
inject non-conversation beans into beans that belong to conversation groups
also.
The
complete application is available
here
(
DSGroupedConversationScoped_XI).
3. Sub-Conversation-Groups
DeltaSpike
supports parallel "isolated" conversations and parallel grouped
conversations. This features discourages nested (grouped) conversations,
because instead of nesting (grouped) conversations, we can simply run them in
parallel and obtain a less-coupled model. Moreover, we can rely on DeltaSpike
to begin/close the (grouped) conversations, or we can explicitly close a
conversation (group) from a conversation (group) bean, from outside the
conversation (group), and even close all (grouped) conversations. This provides
us the opportunity to obtain a
fine-tuning of parallel (grouped) conversations flow.
But,
sometimes it may be really important to have sub-groups. Practically, via sub-groups,
we can shutdown only a part of a group (a subset of beans from that group). A
sub-group is just a class or an interface used to identify a bunch of beans
within a group. To terminate such a sub-group, it is just needed to pass the
class/interface to the corresponding API for terminating a conversation.
DeltaSpike will use that class/interface to identify the sub-group.
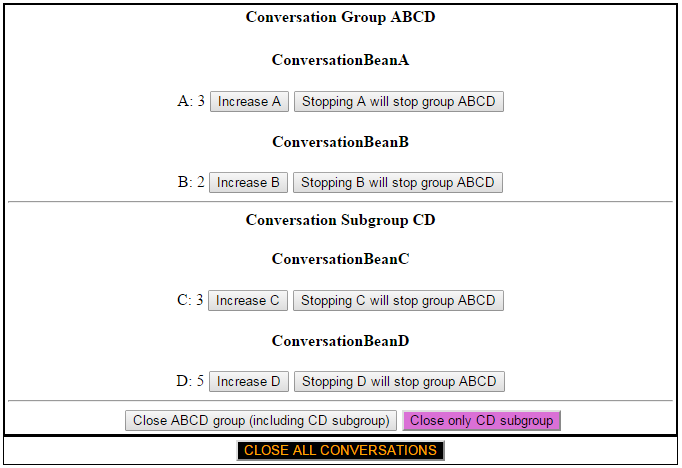
For
example, let's define a group named ABCD (contains ConversationBeanA, ConversationBeanB, ConversationBeanC and ConversationBeanD), and a
sub-group CD (contains
ConversationBeanC and ConversationBeanD). We also
provide controls to close group and sub-group, as in figure below:
a. Listing beans of a sub-group
First,
we define the group class/interface (class in this case), ConversationABCDGroup:
public class
ConversationABCDGroup {
// NOPE
}
Each
bean will use the @ConversationGroup(ConversationABCDGroup.class) to show
its "affiliation" to the ABCD group. Below, you can see the source code of ConversationBeanA (you can
easily intuit the source code of ConversationBeanB, ConversationBeanC and ConversationBeanD):
@Named
@GroupedConversationScoped
@ConversationGroup(ConversationABCDGroup.class)
public class
ConversationBeanA implements Serializable {
@Inject
private GroupedConversation conversation;
private int A;
public ConversationBeanA() {
A = 0;
}
public void increaseA() {
A++;
}
public void finish() {
this.conversation.close();
}
public int getA() {
return A;
}
public void setA(int A) {
this.A = A;
}
}
Now,
we indicate that ConversationBeanC and ConversationBeanD belongs to
a sub-group, CD.
i. Explicitly Listing Beans of a sub-group
via #subGroup/#of
First,
we need to indicate the class/interface of the sub-group. This class/interface
should be annotated with @ConversationSubGroup#subGroup or @ConversationSubGroup#of, as
below:
·
List sub-group beans via @ConversationSubGroup#subGroup
(in
this case, the sub-group class extends the group class (in case of interface,
implement it))
@ConversationSubGroup(subGroup =
{ConversationBeanC.class, ConversationBeanD.class})
public class
ConversationCDSubgroup extends ConversationABCDGroup {
// NOPE
}
·
List sub-group beans via @ConversationSubGroup#of (no need
to extend/implement the group class/interface):
@ConversationSubGroup(of=ConversationABCDGroup.class,
subGroup = {ConversationBeanC.class, ConversationBeanD.class})
public class
ConversationCDSubgroup {
// NOPE
}
The
complete application is available
here
(
DSGroupedConversationScoped_VIII).
ii. Using implicit sub-groups
Sometimes,
listing beans of a sub-group can become a verbose task. For example, imagine
that you have multiple sub-groups and dozens of beans, then it will be really
unpleasant to maintain those sub-groups by moving, removing, adding beans. So if
you have a lot of such beans or you would like to form (sub-)use-case oriented
groups, you can use implicit sub-groups. In this case, we follow three steps:
first, we define an interface that "marks" all beans from a
sub-group; second, we define the sub group class/interface and indicate that
interface; third, we implement this interface in each bean that should belong
to our sub-group.
So,
let's define the interface:
public
interface CDInterface {
// NOPE
}
Further
the sub-group class/interface (class in our example):
@ConversationSubGroup(of =
ConversationABCDGroup.class, subGroup = CDInterface.class)
public class
ConversationCDImplicitSubgroup {
// NOPE
}
Finally,
we add ConversationBeanC and ConversationBeanD to the sub-group:
@Named
@GroupedConversationScoped
@ConversationGroup(ConversationABCDGroup.class)
public class
ConversationBeanC implements CDInterface, Serializable {
...
}
@Named
@GroupedConversationScoped
@ConversationGroup(ConversationABCDGroup.class)
public class
ConversationBeanD implements CDInterface, Serializable {
...
}
Practically,
each bean which implement the CDInterface interface will belong to the CD
sub-group.
The
complete application is available
here
(
DSGroupedConversationScoped_IX).
b. Closing
sub-groups
In
order to close a sub-group, we need to inject the GroupedConversationManager and
invoke closeConversationGroup(), as
below:
GroupedConversationManager#closeConversationGroup(fooSubGroup.class);
For
example, we close the CD sub-group
as below:
@Inject
private
GroupedConversationManager conversationManager;
public void
finish() { this.conversationManager.closeConversationGroup(ConversationCDSubgroup/ConversationCDImplicitSubgroup.class);
}
The
complete application with explicit listing of sub-group beans is available
here,
and the complete application with implicit sub-groups is available
here.
Both applications produce the same output (just "play" with the
interface to see how CD sub-group works):
Hope
you enjoyed DeltaSpike (grouped) conversations. See you in the next
post about JSF
custom scope.







 Ajax
Ajax Beans
Beans Callbacks
 Components
 Events
 Exceptions
 Faces
Faces Facelets
 JSON
JSON Hacks
Hacks State
State  JNDI
JNDI Platform
 Utils
Utils Messages
 MapWrapper
 Reflection
 Renderers
 ResourcePaths
 XML
XML Servlets
 Arrays
 Converters
 Dates
Dates Numbers
 Objects
 Strings


 <h:inputText/>
  ZEEF JSF Beginner's Guide
  JSF 2 Tutorials at www.mkyong.com
  JavaServer Faces (JSF) Tutorial





 Postări


